GARDEN CENTER & NURSERY

LANDSCAPING SERVICES

MAINTENANCE

HOURS

Vines Planting Instructions

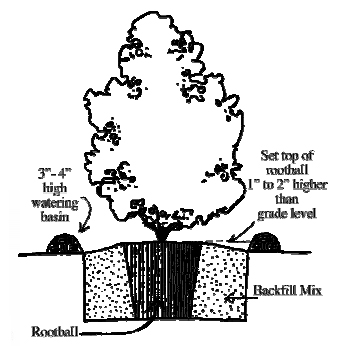
Location and SelectionNot all vines are alike. Think about what you would like the vine to do before you grab the first pretty pot! Would you like the vine to sprawl on the ground as a ground cover or climb a wall or trellis? Would you rather have something that stays evergreen in the winter or can it lose it’s leaves? Will the vine be growing in the sun or shade? Would you like your vine to produce ornamental flowers or berries? Do you want to attract Hummingbirds? Take all these things into consideration before choosing your vine. Make sure that your vine is appropriate for your location.Planting Dig a hole twice as wide and only as deep as the root ball of the vine. Be sure to adjust the hole so that the top of the root ball is 1" to 2" above ground level. Next, remove the container. Plastic pots can be removed by turning the plant upside down or laying it on its side and gently tapping at the pot until it slides out. Refill the hole with a blended mixture of 1/3 Soil Pep and 2/3 of your garden soil. Firm the backfill by tamping it gently. Build a watering basin around the plant high enough to hold 3" to 4" of water. Make the basin at least as wide as the hole that was dug. Immediately water the plant deeply by filling the basin with water once, letting it soak in, and filling it up a second time. The use of Fertilome Root Stimulator at planting time will greatly reduce transplant shock and encourage your vines to resume their normal growing habits more quickly.FeedingNext spring, fertilize with Bookcliff Gardens Choice Professional Turf Food. Scatter evenly beneath the plant in late April and then again in mid June. Be sure to water it in well after applying. This will give your vine a slow, even feeding throughout the growing season.Vine CategoriesVines fall into four general climbing categories:1) Twining: New growth on these vines twist and spiral as they grow. They twist around themselves and other plants nearby. These vines require some guidance and a structure to grow on. Vines that fall into this category are: Honeysuckle, Wisteria, Bittersweet, Clematis, and Silverlace.2) Tendrils: These vines have specialized growths that reach out and grab onto the nearest thing they can make contact with. Engleman Ivy and Grapes fall into this category.3) Clinging: These vines can climb up a wall without a trellis or support. They have “Sucker Discs” that hook into small irregularities and crevices on flat surfaces. Vines in this category might be: Wintercreeper, Trumpet Vine, Boston Ivy and English Ivy.4) Must Be Tied: Some vines have no means of support and they need to be tied to a trellis. A familiar vine that falls into this category would be Climbing Roses.

Training and PruningMost vines are just pruned to keep them within bounds, but you can “renovate” your old vine occasionally. Do this by thinning out dead, old, or winter damaged growth to encourage fresh new, lush vines. Most Clematis varieties that are grown here are best maintained by cutting the entire plant back to 12” early each spring.Plants such as Wisteria, Trumpet Vine and Grapescan be pruned into a permanent, woody framework. To do this, form a multi or single trunk up to the height desired and horizontal branches or “arms” to cover the area. The vine can be maintained to the basic size of your framework by pruning back to two bud “spurs” early each spring.WateringIt is impossible to give a watering schedule that will be right for everyone all of the time. Factors such as the soil type, how big the plant is, how fast the plant is growing, air temperature, humidity, wind and light intensity all will affect how often a particular plant will need watering.The basic rule of thumb is to water deeply, but infrequently. Get the water down a minimum of 18" at each watering. This encourages the plant to develop a deep, drought tolerant root system. Then give the soil a chance to dry slightly between waterings. It is common for people to kill or unnecessarily stress their plants by watering too frequently. The roots of a plant require oxygen in order to function. If the soil is constantly waterlogged, there is not enough oxygen available to the root system and the roots suffocate and begin to die.Knowing this, our recommendation is to water deeply by building a basin around plants that are not watered by lawn sprinklers. It should be wide enough to accommodate the root system of the plant (generally out to the drip line of the plant) and high enough to hold three or four inches of water when full. Fill the basin full, let it soak in, and fill it a second time. Then don't water the plant again until the soil in the basin begins to dry. Don't just look at the soil surface; dig down 4" to 6" to see how dry the soil is. The soil should be showing some significant drying down at that depth. One little trick is to scoop up a handful of soil from that depth and squeeze it into a ball. If the ball holds its shape after you let go, the soil is still wet. If the ball falls apart, it’s time to water. Using this method several times, you will be able to determine your own watering schedule.For plants that will be watered with lawn sprinklers, water as described above at planting time. Then remove the basin. Most of the plant's day to day water needs will be met by the lawn watering. However, a deep soaking every month or two is recommended in addition to the lawn watering. In addition, during the winter a monthly deep soaking of all newly planted shrubs is a good idea. This should be done for the first two winters after planting.

Download PDF Instructions

Questions?

Call 242-7766

Our GuaranteeThanks for buying a plant from Bookcliff Gardens. Our goal is that you be successful with every plant you purchase from us. We'll try to give you as much information and instruction as it takes to make this happen. If you have any questions, please ask! We'll do our best to answer them. However, since this is not a perfect world, and in spite of the best of both of our efforts, plants sometimes die. If this happens within the first year after buying the plant from us, we will replace it; give you an equal amount of credit; or refund the purchase price. You must have your receipt for the guarantee to be honored. We limit our guarantee to replacing a plant only once, and the guarantee does not apply to annual bedding plants, perennials or house plants. If you're having a problem with a plant, come in and talk to us about it; we'll try to find out what happened so we won't lose another plant. It's in both of our interests that the plants you buy from us grow and thrive. We want you to be successful!

Read more: Vines Planting Guide

GARDEN CENTER & NURSERY

LANDSCAPING SERVICES

MAINTENANCE

HOURS

Shade and Ornamental Trees Planting Instructions

Location and SelectionBe careful to choose the right-sized tree for the area you have in mind. Even though they may all look the same size when you buy them, trees grow to different sizes. If you're looking for shade, a larger tree is generally best. If your area is smaller, a blooming ornamental tree will fill the area and provide a bonus of colorful flowers or fruit. Understand too, that there are “good” trees, and there are fast-growing trees, but there are really no good, fast-growing trees. You’ll need to decide what is more important to you. The fastgrowing trees (Poplars, Cottonwoods, Willows, and the like) grow very fast and give shade quickly, but they can have more problems with insects, diseases, shallow aggressive roots, and weak branching. The more moderately growing trees take longer to get to size, but are generally more carefree.PlantingDig a hole twice as wide and only as deep as the rootball of the tree. Be sure to adjust the hole so that the top of the rootball is 1" to 2" above ground level. Next, remove the container. Plastic pots can be removed by turning the plant upside down or laying it on its side and gently tapping at the pot until the plant slides out. Fiber pots are easily removed by placing the plant in the hole and cutting around the bottom of the pot. Then slit the pot vertically and carefully peel the sides off. Refill the hole with a blended mixture of 1/3 Soil Pep and 2/3 of your garden soil. Firm the backfill by tamping it gently. Build a watering basin around the plant high enough to hold 3" to 4" of water. Make the basin at least as wide as the hole that was dug. Immediately water the tree deeply by filling the basin with water once, letting it soak in, and filling it up a second time. If the tree is in a lawn, remove the basin after this initial watering. The use of Fertilome Root Stimulator at planting time will greatly reduce transplant shock and encourage your trees to resume their normal growing habits more quickly.FeedingNo additional fertilizer is usually needed the first year the tree is planted. Once the tree has established itself, it can be fertilized with Bookcliff Gardens Choice Professional Turf Food. Apply it in late April after irrigation water is available and again in mid June. Be sure to water it in well after applying. Iron supplements may be needed for certain trees. Use Fertilome Liquid Iron two to four times in the spring and early summer. The iron will do the most good if it’s applied at the same time as the Professional Turf Food.

PruningMost trees require little, if any pruning to maintain desired shape and vigor. Pruning is best confined to removal of dead, diseased, unsightly, or competing branches. Most pruning is best done in early spring. Many people like to remove the lowest branches of a tree to make it possible to walk underneath the tree. This should be done gradually, only removing a couple branches each year. When pruning, it's very important that the pruning cut is made outside of the branch collar. If you're unsure about where to make the cut, come see us at Bookcliff Gardens.WateringIt is impossible to give a watering schedule that will be right for everyone all of the time. Factors such as the soil type, how big the plant is, how fast the plant is growing, air temperature, humidity, wind and light intensity all will affect how often a particular plant will need watering.The basic rule of thumb is to water deeply, but infrequently. Get the water down a minimum of 18" at each watering. This encourages the plant to develop a deep, drought tolerant root system. Then give the soil a chance to dry slightly between waterings. It is common for people to kill or unnecessarily stress their plants by watering too frequently. The roots of a plant require oxygen in order to function. If the soil is constantly waterlogged, there is not enough oxygen available to the root system and the roots suffocate and begin to die.Knowing this, our recommendation is to water deeply by building a basin around trees that are not watered by lawn sprinklers. It should be wide enough to accommodate the root system of the plant (generally out to the drip line of the plant) and high enough to hold three or four inches of water when full. Remember that this basin will need to be enlarged as the tree grows. Fill the basin full, let it soak in, and fill it a second time. Then don't water the plant again until the soil in the basin begins to dry. Don't just look at the soil surface, dig down 4" to 6" to see how dry the soil is. The soil should be showing some significant drying down at that depth. One little trick is to scoop up a handful of soil from that depth and squeeze it into a ball. If the ball holds its shape after you let go, the soil is still wet. If the ball falls apart, it’s time to water. Using this method several times, you will be able to determine your own watering schedule.For plants that will be watered with lawn sprinklers, water as described above at planting time. Then remove the basin. Most of the plant's day to day water needs will be met by the lawn watering. However, a deep soaking every month or two is recommended in addition to the lawn watering. In addition, during the winter a monthly deep soaking of all newly planted trees is a good idea. This should be done for the first two winters after planting.

Download PDF Instructions

Questions?

Call 242-7766

PestsMost disease and insect problems should be dealt with as they appear. Because of thevariety of possible problems, proper diagnosis is very important. Bring in an affected plant sample to Bookcliff Gardens where we can diagnose the problem and prescribe proper treatment. An application of Fertilome Dormant Oil Spray in early March can help prevent lots of problems in the coming season as well.Our GuaranteeThanks for buying a plant from Bookcliff Gardens. Our goal is that you be successful with every plant you purchase from us. We'll try to give you as much information and instruction it takes to make this happen. If you have any questions, please ask! We'll do our best to answer them. However, since this is not a perfect world, and in spite of the best of both of our efforts, plants sometimes die. If this happens within the first year after buying the plant from us, we will replace it; give you an equal amount of credit; or refund the purchase price. You must have your receipt for the guarantee to be honored. We limit our guarantee to replacing a plant only once, and the guarantee does not apply to annual bedding plants, perennials or house plants. If you're having a problem with a plant, come in and talk to us about it; we'll try to find out what happened so we won't lose another plant. It's in both of our interests that the plants you buy from us grow and thrive. We want you to be successful!

Read more: Trees Planting Guide

GARDEN CENTER & NURSERY

LANDSCAPING SERVICES

MAINTENANCE

HOURS

Roses Planting Instructions

Different types of rosesWe divide roses into four basic groups. The first group consists of hybrid tea and grandiflora roses. These are taller (4' to 6' tall) plants which bear large single-stemmed flowers, and are the best plants for cut flowers. The second group, floribundas, are generally smaller (2' to 4' tall) plants which bear smaller flowers in large, showy clusters. Usually unsatisfactory for cut flowers, they make an excellent longblooming landscape shrub. The third group, climbing roses, produce long canes that work well trained up along fences or trellises. And lastly, there are shrub roses. These are plants which are chosen for carefree garden culture and usually don't require any of the typical rose care and pruning.PlantingDig a hole twice as wide and only as deep as the rootball of the plant. Adjust the hole so that the top of the rootball is 1" to 2" above ground level. Next, remove the container. Plastic pots can be removed by turning the rose upside down and gently easing the plant out. Refill the hole with a blended mixture of 1/3 Soil Pep and 2/3 of your garden soil. The use of Fertilome Root Stimulator at planting time will greatly reduce transplant shock and help the plant resume normal growth more quickly.FeedingRoses are extremely heavy feeders. Feed them monthly from mid April to mid July with Fertilome Rose And Flower Care. Sprinkle the recommended amount around the plant and immediately water it in well.

PruningRoses should be pruned in early April as the buds swell. All dead or winter damaged canes should be removed. Remove crossing or competing canes. Your goal is to shape the plant into an upside down cone with no branches in the middle. Cut back remaining canes to about 12". Cut immediately above an outward facing bud. Paint over cut ends with Fertilome Pruning Paint to prevent problems with cane borer. WateringIt is impossible to give a watering schedule that will be right for everyone all of the time. Factors such as the soil type, how big the plant is, how fast the plant is growing, air temperature, humidity, wind and light intensity all will affect how often a particular plant will need watering.The basic rule of thumb is to water deeply, but infrequently. Get the water down a minimum of 18" at each watering. This encourages the plant to develop a deep, drought tolerant root system. Then give the soil a chance to dry slightly between waterings. It is common for people to kill or unnecessarily stress their plants by watering too frequently. The roots of a plant require oxygen in order to function. If the soil is constantly waterlogged, there is not enough oxygen available to the root system and the roots suffocate and begin to die.Knowing this, our recommendation is to water deeply by building a basin around roses that are not watered by lawn sprinklers. It should be wide enough to accommodate the root system of the plant (generally out to the drip line of the plant) and high enough to hold three or four inches of water when full. Fill the basin full, let it soak in, and fill it a second time. Then don't water the plant again until the soil in the basin begins to dry. Don't just look at the soil surface; dig down several inches to see how dry the soil is. The soil should be showing some significant drying down at that depth. One little trick is to scoop up a handful of soil from that depth and squeeze it into a ball. If the ball holds its shape after you let go, the soil is still wet. If the ball falls apart, its time to water. Using this method several times, you will be able to determine your own watering schedule. In addition, during the winter a monthly deep soaking of all newly planted roses is a good idea. This should be done for the first two winters after planting.PestsRoses are subject to several insect problems: aphids, thrips, cane borer, and spider mites being the most common. Regular use of Fertilome Rose & Flower Food w/ Systemic Insecticide or Bayer All In One Rose & Flower Care will minimize infestations of these pests. If problems occur in spite of this, using Bayer Rose & Flower Insect Killer or Ortho Systemic Insect Killer will help bring these pests under control. Cane borer is best prevented by painting cut cane ends with Fertilome Pruning Paint after pruning. Our most common disease problem is powdery mildew. To prevent this disease, use sprays of Ortho Rose Pride Disease Control during late spring and during periods of cloudy, rainy weather. Avoid getting the foliage wet when you water the plant to greatly decrease the occurrence and severity of the disease.WeedingRoses have a shallow root system, so it is not advisable to cultivate under rose bushes to remove weeds. Hand pull weeds or spray weeds with Hi-Yield Kill-Zall, being careful not to get it on the rose's foliage. The best solution is to heavily mulch your rose bed with a 2" to 3" layer of bark chips or cedar mulch. This will keep weeds down as well as protecting your rose's shallow root system.

Download PDF Instructions

Questions?

Call 242-7766

Winter CareRoses need some specialized care to get them ready for the winter. First, don’t fertilize them after the first of August. Also, as the weather cools down in the fall, start to wean your roses off of their frequent watering schedule. You want to encourage them to slow down their growth and start to slide into dormancy. Once the ground has frozen in late November or early December, mulch them in for the winter by putting a 12” tall pile of a coarse organic material such as Cedar Mulch, straw, wood chips or chopped leaves (not grass clippings) over the plant to protect it from winter’s cold. Don’t apply the mulch too early in the fall; wait until the ground has frozen. In the spring, gently spread the mulch out around your roses.Our GuaranteeThanks for buying a plant from Bookcliff Gardens. Our goal is that you be successful with every plant you purchase from us. We'll try to give you as much information and instruction as it takes to make this happen. If you have any questions, please ask! We'll do our best to answer them. However, since this is not a perfect world, and in spite of the best of both of our efforts, plants sometimes die. If this happens within the first year after buying the plant from us, we will replace it; give you an equal amount of credit; or refund the purchase price. You must have your receipt for the guarantee to be honored. We limit our guarantee to replacing a plant only once, and the guarantee does not apply to annual bedding plants, perennials or house plants. If you're having a problem with a plant, come in and talk to us about it; we'll try to find out what happened so we won't lose another plant

Read more: Roses Planting Guide

HOURS

Flowering Shrubs Planting Instructions

Location and selection
Be sure to choose the right-sized shrub for the area you have in mind. Many people are disappointed when their small, pretty bush quickly outgrows the area they planned for it. Some plants thrive in full, hot sun while others require shade. Match the plant with the area you have for it. A selection of different types of shrubs planted in the yard provides a variety of flower colors, blooming periods, sizes and textures, and lends interest to the garden.

Planting
Dig a hole twice as wide and only as deep as the rootball of the shrub. Be sure to adjust the hole so that the top of the rootball is 1" to 2" above ground level. Next, remove the container. Plastic pots can be removed by turning the shrub upside down or laying it on its side and gently tapping at the pot until the shrub slides out. Refill the hole with a blended mixture of 1/3 Soil Pep and 2/3 of your garden soil. Firm the backfill by tamping it gently. Build a watering basin around the shrub high enough to hold 3" to 4" of water. Make the basin at least as wide as the hole that was dug. Immediately water the shrub deeply by filling the basin with water once, letting it soak in, and filling it up a second time. If the shrub is in a lawn, remove the basin after this initial watering. The use of Fertilome Root Stimulator at planting time will greatly reduce transplant shock and encourage your shrubs to resume their normal growing habits more quickly.

Feeding
No additional fertilizer is usually needed the first year the shrub is planted. Once the shrub has established itself, it can be fertilized with Bookcliff Gardens Choice Professional Turf Food. Apply it in late April after irrigation water is available and again in mid June. Be sure to water it in well after applying. Iron supplements may be needed for certain shrubs. Use Fertilome Liquid Iron two to four times in the spring and early summer. The iron will do the most good if it’s applied at the same time as the Professional Turf Food.

Pests
Most disease and insect problems should be dealt with as they appear. Because of the variety of possible problems, proper diagnosis is very important. Bring in an affected plant sample to Bookcliff Gardens where we can diagnose the problem and prescribe proper treatment. An application of Fertilome Dormant Oil Spray in early March can help prevent lots of problems in the coming season as well.


Watering
It is impossible to give a watering schedule that will be right for everyone all of the time. Factors such as the soil type, how big the plant is, how fast the plant is growing, air temperature, humidity, wind and light intensity all will affect how often a particular plant will need watering.

The basic rule of thumb is to water deeply, but infrequently. Get the water down a minimum of 18" at each watering. This encourages the plant to develop a deep, drought tolerant root system. Then give the soil a chance to dry slightly between waterings. It is common for people to kill or unnecessarily stress their plants by watering too frequently. The roots of a plant require oxygen in order to function. If the soil is constantly waterlogged, there is not enough oxygen available to the root system and the roots suffocate and begin to die.

Knowing this, our recommendation is to water deeply by building a basin around plants that are not watered by lawn sprinklers. It should be wide enough to accommodate the root system of the plant (generally out to the drip line of the plant) and high enough to hold three or four inches of water when full. Fill the basin full, let it soak in, and fill it a second time. Then don't water the plant again until the soil in the basin begins to dry. Don't just look at the soil surface; dig down 4" to 6" to see how dry the soil is. The soil should be showing some significant drying down at that depth. One little trick is to scoop up a handful of soil from that depth and squeeze it into a ball. If the ball holds its shape after you let go, the soil is still wet. If the ball falls apart, its time to water. Using this method several times, you will be able to determine your own watering schedule.

For plants that will be watered with lawn sprinklers, water as described above at planting time. Then remove the basin. Most of the plant's day to day water needs will be met by the lawn watering. However, a deep soaking every month or two is recommended in addition to the lawn watering. In addition, during the winter a monthly deep soaking of all newly planted shrubs is a good idea. This should be done for the first two winters after planting.

Download PDF Instructions

Questions?

Call 242-7766
Pruning
Most shrubs require little, if any, pruning to maintain desired shape and vigor. Pruning is best confined to removal of dead, diseased, unsightly, or competing branches. Shrubs that bloom in the spring (lilacs, forsythia, snowball quince, etc.) can be pruned immediately after blooming. Shrubs that bloom later (spireas, potentilla, buddleia, etc.) are best pruned in the early spring, before they begin growth. Flowering shrubs with a suckering type habit of growth (lilacs, snowball, dogwoods, etc.) should be periodically renovated by removing older (5 to 10 year old) woody stems at ground level.

Our Guarantee
Thanks for buying a plant from Bookcliff Gardens. Our goal is that you be successful with every plant you purchase from us. We'll try to give you as much information and instruction as it takes to make this happen. If you have any questions, please ask! We'll do our best to answer them. However, since this is not a perfect world, and in spite of the best of both of our efforts, plants sometimes die. If this happens within the first year after buying the plant from us, we will replace it; give you an equal amount of credit; or refund the purchase price. You must have your receipt for the guarantee to be honored. We limit our guarantee to replacing a plant only once, and the guarantee does not apply to annual bedding plants, perennials or house plants. If you're having a problem with a plant, come in and talk to us about it; we'll try to find out what happened so we won't lose another plant. It's in both of our interests that the plants you buy from us grow and thrive. We want you to be successful!

Read more: Shrubs Planting Guide

GARDEN CENTER & NURSERY

LANDSCAPING SERVICES

MAINTENANCE

HOURS

Potato Planting Instructions

Potato TypesRussets are your typical baking potato. They are also excellent for mashing and frying. They have dry, flaky white flesh. Their skins are fairly thick which makes them better for storing.Red Potatoes are considered to be boiling or salad potatoes, though they are also great mashed. Their skin is red in color and their flesh is white and moist. They don’t store as well as russets.Cobblers are thin-skinned white potatoes. These are all purpose potatoes that lend themselves to frying and mashing. Being thin-skinned, they are not as good a keeper as russets.Soil PreparationPotatoes need abundant soil oxygen and do not thrive in tightly packed soils. If your garden has heavy soil, take the time to amend it. Add well decomposed organic matter such as peat moss, barkmulch, compost, or manure to lighten up the soil’s texture. It is also beneficial to add a complete fertilizer containing nitrogen, phosphorus and potash. Bookcliff Gardens Choice Vegetable Garden Fertilizer is an excellent fertilizer. Thoroughly mix it in before planting, following label directions.PlantingPlant your seed pieces sometime during March and April. Seed pieces should be cut to the size of a medium egg. There should be at least two eyes on each piece. If you like, you can dust the seed pieces with Captan fungicide. This usually isn’t necessary if the soil temperature is at least 50 degrees and moist. Allow cut faces of pieces to dry over night before planting. Plant your seed pieces with the eye facing up, 3” to 4“ deep and about 12 inches apart if planted in rows. If planted in separate hills, leave 2 1/2 to 3 feet between each plant. Potatoes actually grow off of the plant stem, not on the roots. When plants are 3 to 4 inches high, gradually start hilling up some light garden soil around the growing stems. Continue to do this to a total depth of 8 to 10 inches. Potatoes enjoy cool roots. Mulch with 2”-4” of loose organic material like bark chips, cedar mulch, or straw.WateringProper watering is one of the most important factors when tending to your potatoes. From the time of planting to full tuber maturity, maintain uniform soil moisture. Keep the soil moist, not soggy. Do not allow the foliage to wilt. Dry soil will result in misshapen, split or hollow tubers. As the tubers reach maturity, they will require less water.Pest ControlInspect your plants frequently for pests. There are a variety of insects and diseases which attack potatoes. If you’re not sure about what kind of pest may be attacking your plants, bring in a sample of a bug and a leaf to us at Bookcliff Gardens. We can help direct you to the proper form of control. Tend to your weeds early on in the season so they don’t become invasive. Avoid extensive hoeing or cultivating within 6 inches of the plants because feeder root damage can occur, or you can scar the developing potatoes.

Download PDF Instructions

Questions?

Call 242-7766

HarvestingIf you enjoy new potatoes, dig some as soon as the tops flower. Leave the rest for harvest when they completely mature. If you will be storing your potatoes for winter, leave them in the ground for about two weeks after the vines have died down before digging. Dig your potatoes when the air temperature is above 45° and the soil is not wet. Avoid bruising the potatoes when digging them. Place your potatoes in a slatted crate or basket and cover with bags or newspapers to keep out the light. Place them in the dark for a week at about 70 degrees to condition the skins. Then store them at 38 to 45 degrees and keep the humidity high.

Read more: Potatoes Planting Guide

We Help...You Grow